 |
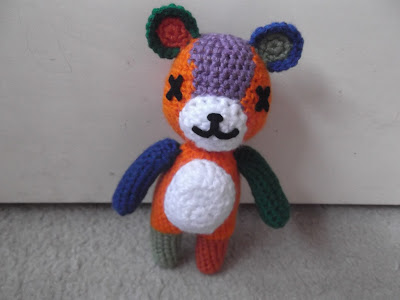
| When finished, Stitches stands about 8 inches tall |
First and foremost, this is my first priced pattern. So if you want to make this pattern, you can find it over on my Etsy shop. I'm still working on a good name for me shop, but any feedback would be awesome! c:
I was really excited to start on this pattern, because as you may well know, I had wanted it to be my first pattern. But it turned out just fine, and making Goose was a great learning experience, even if I did have to redo a lot of things a lot of times.
 I started out with his legs. Looking at reference images of Stitches, I figured it would be best to work upwards onto his body as well, instead of sew legs on separately. I didn't want his legs really close, so I figured out a way to make a little gap and it turned out really nicely.
Next I worked on his belly. I decided to crochet it separately, because I was too lazy to do all that carrying work, etc. But I think it was a good decision because it give him more of a belly, hehe. I think I may have done a sloppy job of sewing it on though, because it was my second time. I realized too late I had sown it onto his back!

Next I did his arms. They were really simple to do, but I did have to get the length just right. But that wasn't too hard.
Then I started work on his head. His head was definitely the most daunting. I made many errors, and just when I thought I got it done to my satisfaction, I found something that was off, and had to start at the beginning. The first head I actually completed ended up looking too small. I have a picture of it at the bottom. My little sister said it 'didn't look like Stitches' and I had to agree. So I did made his head again. The finished one that left me satisfied is pictured. It gave me a lot of practice carrying yarn and changing colors. There are some tricky parts, but if you buy the pattern, I go through it in the instructions.

His ears were pretty simple and easy to put together. I definitely enjoyed crocheting these the most.

His head after I sewed his ears on. He is beginning to look very cute indeed.

Cannot forget his little tail!

These were the first felt pieces I cut out, that were then glued onto his first head. Because it was my first time working with felt, I quickly came to realize, cutting up felt can be quite messy, and that felt tears pretty easily. That makes it a little difficult when you're cutting out little pieces. I found out from another blog that if you use freezer paper, it will really help when cutting out shapes. But, we don't have any freezer paper in the house, so I just tried regular scrap paper. It helped... a little, but not much, haha. Otherwise, it just takes a steady hand and some practice to get the shapes just the way you want them.
 |
| This is Stitches before all his parts were sown on. It looked too cool not to take a picture. |
 |
| This was the first head I completed. As you can see, it looks like a cute bear, but it didn't quite capture Stitches's chubby qualities. So I had to bear up and begin again. |
So, what do you think? I'm pretty satisfied with him. He even looks cute without his shirt. Speaking of shirts, because I'm finished with this little teddy bear, I can work on getting the shirt pattern finished. Hurray! Now, whether it will actually look good on Goose and Stitches is another matter.
Thanks for visiting and till next time!
Thanks for visiting and till next time!


No comments:
Post a Comment